Monday, 26 June 2023

Photo Note Book

Hello!

The Spectrum Gardenia collection is so amazing - so much to create with - I could create so many projects. So of course here is another project for this blog entry today using the small Spiral Notebook out of the notebook set.

I have decorated the front cover using flowers, rubons and lasercut leaves. When the notebook is opened, each page already has a patterned page and all you need to do is add your embellishments and your photos. So clever! It opens up first to pink pages and then to lilac coloured pages. I have used a mix of lasercuts, rubons ephemera, chipboard words, essential file set and washi tape stickers to make the pages:
The next double page is in blue and then in green, using lasercuts, ephemera and rubons to create the pages. The right side of the blue pages, I have used a piece from the Essentials File set to create a flap, and the rubon is from the 12x12 Butterly Flight rubon set. I have also used an essential File piece to create the pocket on the green page and used a lace lasercut piece on the edge of the pocket. 
The final pages are im red and orange, also using a mix of lasercuts, rubons, washi tape stickers and ephemera to decorate the pages. 
On last page of the red set, is a piece of ephemera with the flower pattern - I love this and then had to use it - adding a sentiment rub onto this.
Each page has a tab which I have used wording from the washi tape stickers for each tab.

Thank you for visiting the blog today.

Hugs,
Michelle
These are the products I have used:

Memories - Dusty Attic June Moodboard

Hello lovelies!

I have my take on the June moodboard up on the blog today

I have drawn inspiration off the colours - particularly the purple tones to create my layout
I have used a collection of papers from Studio 73 to create my layout. All my chipboard has been prepped first using white gesso. When the gesso was dry, I then added colour to the chipboard pieces. I used a variation of colours - I used a sponge, painting on stripes - first a dark purple, then a lilac, then a orangey/red acrylic paint, I repeated this process over the surface of the sponge, and then dabbed this into my chipboard pieces to create an ombre effect.
I added the frame (DA2673 - get frames distressed - rectangle) to the photo and adhered this to the page with foam tape down the centre of the photo, adding tags behind this as a mat. The Botanic Ringlets Frame (DA2919) was cut in half - one half added to the top left corner and the other to the bottom right corner. 
From here I began layering my fussy cut elements and the mini foliage (DA3421) around the left side of the photo, around the bottom and towards the right corner. I also created a small cluster to the top right corner of my layout.
Once I had finished the layering of my fussy cut elements and chipboard foliage, I added a part of the title Memories (DA3342) to the layout to finish off.

These are the products I have used:


I hope I have inspired you with the moodboard - why not give the moodboard challenge a try too? Use the moodboard as inspiration to create a project using Dusty Attic chipboard and post your entry to the DustyFANattics facebook page - and you could win one of AUD50 worth of gorgeous Dusty Attic chippie!

Hugs,
Michelle


Sunday, 11 June 2023

This Photo - 49 and Market

Hello everyone,

Oh my gosh, so excited to get to play with the Spectrum Gardenia collection. So many beautiful pieces and all the vibrant colour - just spectacular!

This collection has so many options of playing with different colours and all sorts of elements. I decided to go with the greens and blues in the collection. I have picked the blue and green shaded paper out of the paper collection. From there I have used an envelope type from the Gardenia File Essentials - cut my photo down to fit and sanded the edges of the photo. The matting is made from pieces from the Gardenia Ephemera pack. I wrapped lace like pieces from the Gardenia lasercut pack, also adding other lasercut pieces and ephemera to decorate the envelope. This was adhered to the page with foam tape.
From there I started adding leaves and flowers from the Gardenia lasercut pieces, plus adding in Ephemera pieces through the lasercut clusters.

Lasercut pieces were added with foam tape to provide dimension. I have also used Gardenia chipboard pieces. 
I have also added a moth to the top left corner with foam tape. To finish off, I have added rub-on stitching around the edge of the paper. And I have also added rubon type stamp printing around the cluster - to create a stamped effect.

I am really loving this beautiful collection. I hope you do too!

Hugs,
Michelle


Saturday, 3 June 2023

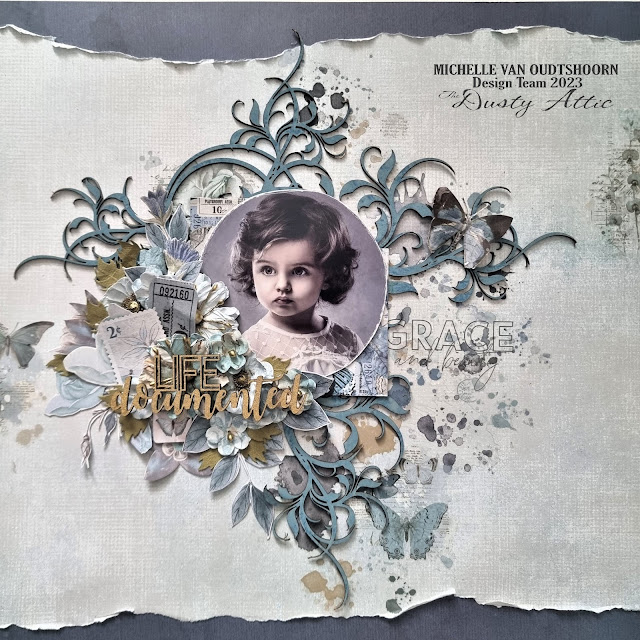
Life Documented - Dusty Attic

 Hello 

A new month, and that means a new project .... yay! But time sure is flying - almost half way through the year, it's crazy!

Here is my project for June:

I have used papers, lasercuts and rubons from the 49 and Market Vintage Artistry Serenity collection to create my layout. I have used the mystic flourish (DA1747) and mystic frame (DA1745). I have coloured these using two different oxide inks to get the colour I needed. I have cut a part of the frame so that I could use one of the small flourish elsewhere.
I then lay down the pieces of chipboard first to see where I wanted to place then. Then I added the rubons before sticking down the chipboard pieces. The photo was then adhered with foam tape over the round part of the chipboard.
From here, I started adding the flower clusters and laser cut pieces, using foam tape to create dimension.

The title one of three titles in a new release word pack #55 (DA3409). This was coloured with a Kaisercraft gold stamp pad, and adhered this to the flower cluster.
These are the chipboard pieces I have used:


Thank you for visiting the blog today.

Hugs,
Michelle