Sunday 26 November 2023

Forever moments - 49 and Market

Hello friends

How beautiful is this new range Vintage Artistry Moonlit Garden? Another absolutely stunning range and I just love the colours - so soft and magical. Here is a layout I have created using some of the products in this range:

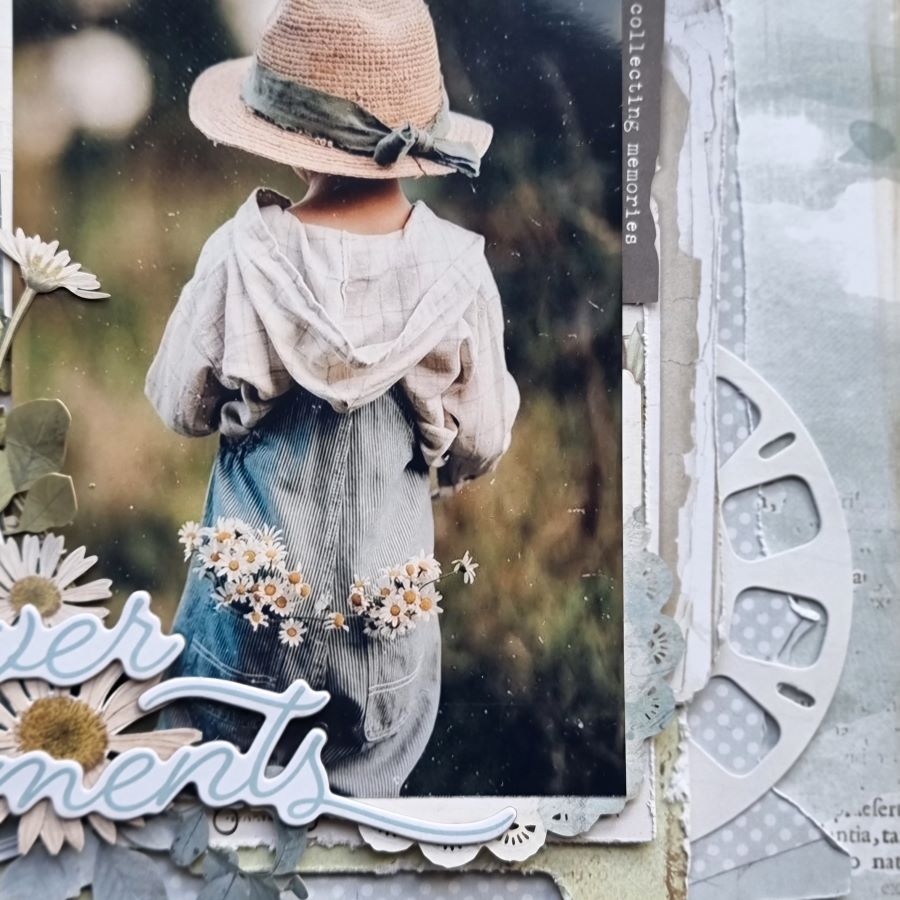
I have started my layout using paper no 2 from the Moonlit Garden Foundations 12x12 paper pack. From here I layered a number of Ephemera (distressing the edges first) behind the photo - some adhered with foam tape to create dimension. This was then adhered to the page,
I then removed all the daisies and the blue and green leaves from the Moonlit Garden Lasercut Elements pack and began to layer these on the left bottom corner - adding in a chipboard ticket feom the Moonlit Garden Chipboard bits. The title "forever moments" is from a pack of Moonlit Gardens Chipboard words pack.
I have also added other lasercut and Ephemera bits under the layers of the photo. The dotted piece of ephemera is from the Moonlit Garden Ultimate Page Kit. The viewmaster slide was cut in half and added on either side of the photo cluster. The little banner with the wording "All my heart" has been added with a brad to create a hanging effect.
I have also added some Ephemera to the bottom right  of the photo.

Thank you for visiting the blog. I hope you enjoy this new collection as much as I have.

Hugs,
Michelle


Vintage Artistry Moonlit Garden - 12x12 Paper Colored Foundations Pack
Vintage Artistry Moonlit Garden - 12x12 Paper Colored Foundations no 2 
Vintage Artistry Moonlit Garden Ephemera Bits
Vintage Artistry Moonlit Garden Lasercut Elements
Vintage Artistry Moonlit Garden Chipboard Bits
Vintage Artistry Moonlit Garden Chipboard Words
Vintage Artistry Moonlit Garden Ultimate Page Kit


Saturday 18 November 2023

My Sunshine - Dusty Attic

Hi there

Back on the blog today with a layout inspired from the November moodboard:

Remember you can also take part in the moodboard challenge by using the moodboard as inspiration and adding Dusty Attic chipboard to your project and show it off on the Dusty FANattics facebook page. Two random entries are chosen to win AU$50 each worth of gorgeous Dusty Attic chippie!!
Here is my layout I have created using the colours from the moodboard:
This layout features a photo of my beautiful daughter. All chipboard has been painted with burnt orange acrylic paint, and some touched with a red acrylic paint.  The photo has been matted with paper and adhered to the page with a piece of foam tape. I added due cuts and flowers around the photo.
All chipboard has been painted with a mix of red and orange acrylic paint - dabbed on with a sponge. I then added stickles to the botanical mix flourishes (DA3351) before adding these under the flowers and the photo matt. I added some crazy stitching (DA1673) to the top left and right bottom of the page

The word disc that says "the sweet life" (DA3321) is one of a number of discs in the pack - the pack has same really great sentiments to use on your layouts. I added buterflies (DA3335) to the flower cluster.
The title is one of a few tags from DA1803.

These are the products I have used:


Thanks for visiting the blog today. I hope to see your take om the moodboard up on the Dusty FANattics Facebook page.

Hugs,
Michelle


Saturday 11 November 2023

This Photo - 49 and Market

Hello friends!

Oh my! Another gorgeous new collection to admire - ARToptions Spice. The colours are just beautiful. Here is a layout I created using this gorgeous new collection. 

Aren't these colours just fabulous? I used papers from the ARToptions Spice 12 x 12 Collection pack. The base paper is the reverse side of the "Ginger Kiss" paper, leaving on the strip at the bottom because I loved the stamps across the strip - I cut that equivalent piece off the top of the paper to keep it at 12 x 12. I tore a piece on top left corner and added a piece of the "Fuchsia Grove" paper, tucking in two tickets from the Spice Ephemera pack. 
The photo is tucked into an envelope - the envelope is from the Spice Cluster kit. I sanded the edges of the envelope first. From here I then added layers of matting to my photo - these matts are pieces from the Spice Ephemera Pack - the edges were distressed first, before I layered them behind the photo. This was then adhered to the page with foam tape down the centre. I then added a stem of the Plum Wildflowers down the left side of the photo, before I began layering the laser cut pumpkins, the wagon wheel and stamp, with other Plum Wildflowers. All these are were layered with foam tape to create dimension.
From here I also created a flower and pumpkin cluster on the right of the photo. I have added some laser cut flowers and the road signs to the cluster too. 
I then created a small cluster feature in the top right corner of the layout, using a "slide" paper from the Ephemera pack. I added this with foam tape, added the hinges from the Cluster Kit chipboard set, and added the title "This photo" with foam tape and embellished it with flowers and laser cuts.
I then finished off by adding buttons and orange dots to the layout placed randomly in the flowers and pumpkin clusters and the page. These come from the Spice Cluster kit too.

Thank you for visiting the blog today. 

Hugs,
Michelle

49 & Market ARToptions Spice Collections Pack 12x12

49 & Market ARToptions Spice 12 x 12 Paper "Fuchsia Grove"

49 & Market ARToptions Spice 12 x12 Paper "Ginger Kiss"

49 & Market ARToptions Spice Laser Cut Elements

49 & Market ARToptions Spice Ephemera Bits

49 & Market ARToptions Spice Cluster Kit

Wildflowers Paper Flowers Plum


Friday 3 November 2023

Treasure the little moments - Dusty Attic

Hello Dusty FANattics

It's hard to believe we just under two months to the end of 2023! Here is my project for November:

The layout is made with Scrapboys papers and 49 and Market flowers. I tore the one paper and adhered it to the base paper. The photos were then matted with distressed papers, and adhered to the page with foam tape. I then used some letters from DA2390 (Jumbled Letters) - painted with white acrylic paint (dabbed on with a sponge), and tucked these under the photo matt as a feature.
The rest of the chipboard was also painted with white acrylic paint and when this was dry, lightly sponged over with a chalk brown paint. Once this was dry, I lightly brushed over the pieces with stickles.
I began first with my flower clusters - and added mini foliage (DA2786) among the layers of flowers. I add the shutters (DA2199) apart and lifted them.
I have also added botanical buttons (DA3316) and added the title Treasure the little moments (DA1606). I finished off adding some white splatters.
These are the products I have used:


Thank you for visiting the blog today.

Hugs,
Michelle