Sunday 6 November 2016

Cherish

Time for an update on my blog, and today I would like to add a page I did back in August and have not come round to adding it. I really loved how this layout turned out. I have used two pieces of cardstock - a very light lavender for the background and then a darker purple, distressed it and laid it on top of the lighter cardstock.

This page was the inspiration off a challenge. 3 patterned papers, min of 6 flowers, bling, chipboard and ribbon had to be in the layout. I also managed to fussy cut the lavender and the bird from one of the patterned paper and incorporated this into the layout. The ribbon is mixed in between the flowers - and the flowers have been added around a chipboard frame. The title is also chipboard, inked and then finished off with glossy accents. A strip of purple and sliver bling has been added to the bottom of the photo.


I finished off by rubbing in some dark purple chalk to the outside of the purple cardstock - which then pops the features in the middle, and then added a Stickles border.

I love this photo of my daughter - and the femininity and bling on this layout epitomises her personality and  loveliness.


Tuesday 25 October 2016

Kaisercraft - Ooh La La

And another for Artfull Crafts as Design Team member ......

Ooh La La - definitely the right way of describing this gorgeous range! So pretty and feminine......

I have used a lovely peach cardstock for my base. I have then cut down the reverse side of the Belle Paper , inked and distressed the edges. I have matted the photo of my gorgeous niece on the reverse side of the Je T'Aime paper and the C'est La Vie paper. The brick wall on the left is cut from the specialty die cut windows paper, and the piece of paper on the right is from the Oui Oui paper.

I have added quite a number of lovely pieces from the Collectables  - the clock, the doilies, the butterfly and the frame feature to the right of the photo.  "You're so lovely" title in the frame is taken from the sticker sheet.

Have a super week!

Michelle

Kaisercraft - Frosted Range

Hello there!

I have created some more Design Team layouts for Artfull Crafts:

When I saw the Kaisercraft Frosted range - I loved it. I love the blue and grey hues .... and I think of Christmas and snow and and bling and sparkles .... so pretty!


I used a plain blue cardstock to start off with.  Cut a rectangular strip from the reverse side of the Icicles paper, distressing the edges and curling up the opposite corners - place this down first. The white cut out - is from a die I borrowed, which I covered in stickles, cut in half and lay this down to line up with the Icicles paper. Then cut about half of the reverse side of the Frozen paper (use the blue), again distressing the edges and layering this on top of the the other Icicle paper. I then cut two smaller pieces - one from the reverse side of the Frozen paper (white bit)  and the other from the cones from the Glacial paper - distressed the edges of these too. From the Icy paper, cut out the Grey frame in the top right hand corner, distress and turn it sideways as part of the matt for the photo. The "photo" - matted on the music part of the Icicle paper is taken from the Correspondence paper - so effective, everyone keeps asking me who is that in the photo!


One of the flourishes is from the Collectables and the other is cut from the Icicles paper. The balance of the words and embellishments are taken from the sticker sheet and the Collectables.

I finished off with a lightly rubbing some darker blue and grey chalk around the papers.

Thanks for popping over!

Michelle

Sunday 7 August 2016

Special Moment

A layout created as part of the Design Team for Artfull Crafts:

Goodness did winter make itself felt this weekend ... the snow fortunately (and maybe unfortunately?) skipped over the Christchurch region. But ... did get to see some flurries!
So with cold weather outside and warm indoors - what else better to do than get some creativity on the go..... and here is my take on the beautiful Kaisercraft Mademoiselle collection. This photo is of my daughter and I on a "girls day out"............


Using a pink Bazzill cardstock as my base, I used the Timepiece paper as the next layer. This was cut down about 1cm all around and the edges distressed. I then cut different rectangular sizes of papers from the BlossomsFloral SpraysCouture and LadyLike papers, distressed the edges and layered these behind the photo.  The green square paper is from the 6x6 pad


I used some flowers,and then the Collectables (these are just gorgeous!) and Stickers from the Mademoiselle range to finish off the layout. Just love the butterfly paper Flutter in this collection - ideal for fussy cutting and adding among the flowers!

Have a lovely week - and keep warm!

Michelle

Wednesday 20 July 2016

Kaisercraft Always and Forever - Mini Album

Another creation done as design team member for Artfull Crafts:

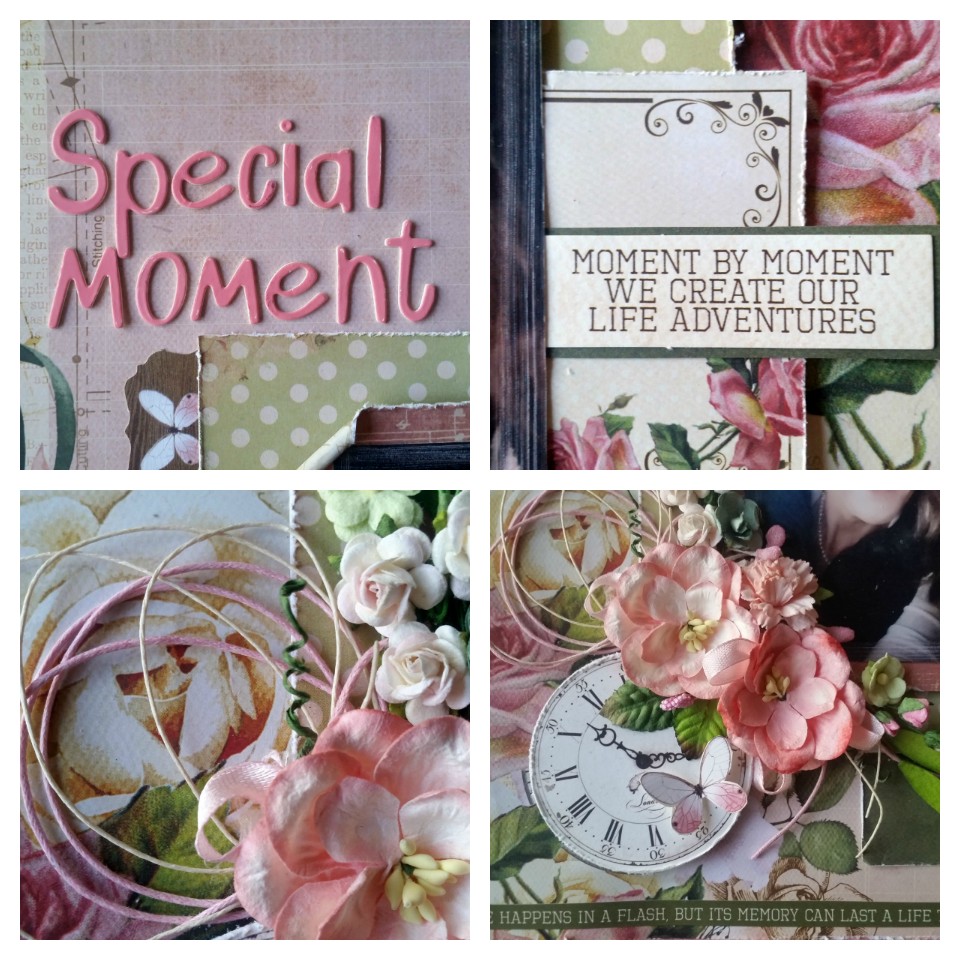
The description of this Always and Forever Kaisercraft range starts off as the collection for the "True Romantic at Heart" .... so apt! And I loved working with it's rustic colours and warm tones - and here below is a few photos from the mini album I created using this beautiful range:


The album has been started from scratch with chipboard for the cover and is about 6" in length and 4,5" across. Covering the chipboard for the base of the album, is the Commitment paper and the spine is the Promise paper - which has been punched along the edges, finishing off the cover with stickers from the Always and Forever range, and flowers from my own stash.

Inside the mini album are 5 pages and a waterfall on the inside cover (middle picture on the bottom of the collage photo below). I have used a ribbon inserted under the cover pages to tie the album.


Each page has been created as a pocket with a tag inserted into each pocket - which has a circle pull tag to pull these out. Each page has been created to have tabs that either lift or open to reveal extra pieces to adhere photos, and other pages have pull out tags for photos. Papers used for these pages were Endless Love (includes cutting out and using some of the quotes on this paper), CommitmentRomance , Eternal (and such a versatile page to use both sides, including fussy cutting the flowers)  and the For Keeps paper (the doilies on this paper are great to fussy cut).


I also used the Devotion paper to create the little envelope and using both sides of the Eternal paper to cover the flaps. I have also used some of the Collectables from this range for embellishing the album. All the pages and the edges of the papers have been inked in a soft brown ink around the edges. Chipboard embellishments and the wood embellishments have been inked to match the paper colours.

I really loved putting this mini album together - and hope you have enjoyed looking the pages.

--Michelle--

Sunday 22 May 2016

White with 1 - May 2016

It has been a while since I took part in any Scrapbooking Challenges - and I decided to go with White with 1 Challenge .....


Here is my take on the Challenge using the lovely Tangerine Tango:


I have used some pictures from the Pion Design paper as my photographs. And the papers are from the 6x6 mini pad of the Graphic 45 Artisan Style Collection. I have then used some chalk and rubbed this in around the design to give it definition.

Thanks for popping over!


Kaisercraft Sea Breeze Album and Card

Good afternoon


Winter has arrived with a vengeance - and it's been a perfect weekend to spend indoors getting stuck into a creative project - using the lovely Kaisercraft Sea Breeze Collection as part of the Design Team for Artfull Crafts. Turquoise and teals - my favourite colours. I decided to create something as a gift - a card and matching mini album.


For this idea, I used mainly card stock and papers from the 6x6 mini paper pad. Lots of fussy cutting here! For the card I cut each piece of the wooden background, and tore the papers to different sizes, to make it look like a wooden board. There is a page in the 6x6 mini album ideal for card makers with die cuts that have words like "Happy Birthday, Thank you, Especially for You and For You" - - I used one of these for my card. 

The mini album is also 6x6 in size. And flips open below to reveal some tags and flip up pages - ideal for lots of photo's:


I have done some decorating on some of the pages and others have been left blank, using just the patterned paper - space for those photos! 


Stay warm everyone ... I am about to go and throw another log on the fire.

Michelle :)

Wednesday 20 April 2016

Kaisercraft - Story Book Collection

I love this Story Book Collection from Kaisercraft. The sentiments written on their stickers, Collectables and cut outs on their pages are perfect for creating lovely projects - all about memories and moments .....  one of them reads "the BEST things in life are the people we love the places we've been .... and the memories we made along the way" - how lovely is that? When I saw the book cover off the speciality paper aptly named book covers (foil)... I decided to create an album using this cover:

The spine of the album is cut from the same speciality foil paper - these are the strips which I then cut down and layered them down the spine - giving the look of a volume book. I have use black card stock to create the pages inside the book.

 The inside of the pages has been decorated using the various papers from the Story Book range, as well the sticker sheet and the Collectables. Both the tags in these pages are free and can be taken out to add photos to them. The little envelope on the left picture and the clock feature on the right picture have only been taped in the corners so that a photo can be tucked in behind these.


I have ony adhered tape down the sides of the circle sticker and added talcum powder to the sticky part of the sticker so that it does not stick - a photo can then be added underneath to be matted onto the blue. I then created a flap on the right hand side that can be lifted up to add photos underneath.


 Again some more feature flaps and tags ........


This is a really fun range ... and would rate this range as one of my favourites!

Michelle VO

Monday 18 April 2016

Kaisercraft Finders Keepers Collection

Creating for Artfull Crafts as Design Team member, using the lovely Kaisercraft Finders Keepers Collection, I created two layouts:

A beautiful bright and fresh range - Kaisercraft Finders Keepers - I decided to do something a little different than my normal style and this is the result:


I cut a frame from chipboard and wrapped the Collectors piece of paper around this - this gave the photos great definition, mounted to the Floral Ticket specialty paper (I actually turned this once anti-clockwise). Using the Collectables and a piece cut from the left over of the Collectors paper,  layered these behind the photo and around it. I fussy cut the flowers from the Curio paper and added some flowers on top of this.


The next layout using the same Finders Keepers range is of my gorgeous niece. 


Using a plain blue cardstock, I used a stencil and some ink and stenciled on the ruler effects in the background. I then stenciled on some gesso. Once this was dry I used some blue ink and sprayed the background as well. Using the cards and tickets off the back of the Admit One paper, a piece from the Collectable paper to mat my photo on, plus some stickers off the sticker sheet - to complete the layout. 

Have a great week!

Michelle

Monday 4 April 2016

Kaisercraft Coastal Escape Range

Hello there

My Artfull Crafts Design Team parcel arrived - all full of beautiful papers and embellishments - I am so going to have lots of fun making up projects from all this loveliness. The first pack of DT papers was the lovely Kaisercraft Coastal Range. Click here to see the range available at Artfull Crafts

Here is my layout using the Kaisercraft Coastal Escape Collection range ....


This photo is of my daughter down at New Brighton Beach - quite appropriate photo for this range I thought. I have used and cut down the Sea Grass paper and distress this before adhering to plain cardstock. I have then cut out various other papers from the range, distressed these and layered behind the photo. The "netting" I cut out pieces from the Woven die cut in this same Kaisercraft range, and layered behind the papers. I also used various bits from the Collectables.


Of course, my layout had to include flowers! I have then finished off the layout with flowers, stickers , charms, twine and some seashells. I then also inked and stamped using Tim Holtz (peacock feathers) on the background page.


I really enjoyed putting this together.

Thanks for popping over - have a great week.


Michelle VO

Sunday 27 March 2016

Adorable

I love long weekends - one of my goals for the long weekend was to try and get some scrapbooking done - and here is the page complete using Prima's Salvage District collection.


This photo is my cousin's children - and I just adore this photo - so happy - and such love between brother and sister. I have fussy cut the little angel from the paper and added some blue ink, also the heart under the flower is from Dusty Attic and then layered various flowers. I also fussy cut the clock from the paper.


Thanks for looking! Have a great Easter weekend :)


Friday 25 March 2016

Artfull Crafts first Design Team Challenge

The new Artfull Crafts design team 2016  were given exactly same pack of papers and embellies and we had to go and create something out this - I have loved how everyone has come up with their own unique and beautiful projects - wow! For the last few days and the balance of March each one of us will be showcasing our creations - check them out here 

I Love You

I was so excited receiveing my parcel - it arrived at 7am - and the end of the day from work could not come fast enough so I could start my first challenge on the design team.

And happiness is .... flowers, ribbon ..... pretty colours ...... 

For my first layout, I used the white cardstock as my background. I then cut down and distressed the edges of the green cardstock. I have used a little gesso and masked with a patterned stencil and then splattered a little orange ink on the green.  I mounted the photo on black and orange cardstock. Cut square frames from the True Love My Sweetheart paper and the True Love My Friend paper, used a 6 x 6 piece of the True Love My Love paper. The I Love You Banner was cut out from the heart on the True Love My Dearest paper. The sentence at the bottom of the layout was taken off the bottom of that same paper.


Next I fussy cut some flowers from True Love My Love paper, which I then arranged with the ribbon and flowers that we received.


Beautiful

I used a dark green cardstock and hand made the paper doily from the True Love My Baby by using a corner punch. The patterned papers are True Love My Precious, My Dearest (which includes the frame for the photo cutting out the middle and inserting the photo) and the My Friend papers. The flourish was cut using the Kaisercraft Decorative Dies Circle Vine.


I used a white pen to outline the edge of the cardstock.

Thanks for popping by!

Michelle VO

Tuesday 23 February 2016

Design Team 2016

It is with great excitement that I can now officially share my wonderful news! I have been chosen to be part of the Design Team for Artfull Crafts for 2016. What an honour! I am very excited to be part of the team this year - and cannot wait to get stuck into creating projects to share. I will be updating my blog, as well as the blog over at Artfull Crafts, plus there is a pin board for each of the Designer's over on Pinterest with all the projects - there is some awesome talent on this 2016 team, and you can read all about the other members here.


Looking forward to an exciting and fun-filled year!

Sunday 14 February 2016

Connoisseur of Cars!

We went up to Nelson as part of our family holiday in 2011 - and this a photo of my son (18 at the time) at the car museum. He loves classic cars - and I am astounded at the amount of knowledge that has on these - especially the cars from the 70's! And hence the title.......

I used a Prima range of papers which I have distressed and layered. The clocks are from Kaisercraft and the chippie is a Dusty Attic - which I inked in black and adhered metal cogs. I dabbed a bit of watered down black gesso around the layered papers and embellies to make it "pop" out. The ink splats are with a gold Bo Bunny ink. The buttons are also Prima, as well as the spark plug.


Sunday 31 January 2016

Silly Selfies

More Than Words is a new challenge blog - And here is their challenge for January - what a lovely theme to introduce themselves and their DT:


I have tried to take selfies - but I just don't seem to get it right. Ask my daughter and she has a whole rule of how this is done - put your head this way, and your eyes like this, and your chin like this ... no matter what I do, I just don't seem to get it right. My daughter takes beautiful selfies. I asked her one night to show me again how it's done and she gets hold of my phone and says "like this Mum" - and the result this silly selfie ..... I just love this photo of her. Here is a layout I did towards the end of last year with the Cocoa Vanilla range of my daughter and her silly selfie - quite appropriate for this months challenge at More Than Words; 


This layout was an inspiration set from an idea that I saw of a colleague who used the circles and stitching, and I added in flowers and some inking. Just love these colours from this range.


hey GOOD looking

It's been a while since I was last on my blog, as not much happened in my scrappy world over Christmas - I guess they don't call it the silly season for nothing. Then I lost my mojo for a while too. But I think I am back and nothing like taking part in monthly challenges to get that creativity going again. So up first the challenge over at  D-LISH Scraps this very inspiring mood board:


These awesome colours inspired my take on the challenge. This is my lovely nephew - when he was much younger. Such a lovely boy and I so love this photo of him. I distressed white card stock and place this on red cardstock. Then with blue gelato and some texture paste stenciled in the clocks. Inked over these and dripped on some Lindy's stamp gang red ink. The chipboard has been painted in white and then dabbed on some blue ink.


Thanks for popping over!!