Sunday, 10 November 2024

Family Moments - 49 and Market Cottage Core

Hello lovelies

And another gorgeous collection from 49 and Market - CottageCore. I am so in love with the colours in this collection. 

I started with the paper called "Memories" from the 12x12 Paper Collection pack, and inked the edges of the page. There are gorgeous frames in the Laser Die Cuts pack in different shades of greens and browns as well as different sizes. I used two frames to mat my photo, as well as a recipe card from the Recipe Card pack. I also used a the top part of a cupboard and a tag - all from the Laser Die Cuts pack. I added the zigzag (also inked) from the Lasercut elements pack before adding my photo matt with foam tape to the page. 
I then began adding blendable rubon transfers around the matted photo. Cutting bits out, and then rubbing them on top of each or next to each other to create dimension behind the photo. 
In the left bottom corner of the photo frame I have added a pot plant from the Lasercut elements and the spoons from the Lasercut Kitchen elements.
In the top right corner I created a hanging garden feature, using foam tape. The quote "memories to treasure and keep" is from the ephemera pack, added with foam tape and using the stars from the Wishing Bubbles pack. I have added the title using the two words "family" and "moments" - inked and added with foam tape (isn't that ephemera apron just the cutest?)
I have added rubon transfer splotches around from the blendable transfer pack.

Products used:
Cottagecore 12x12 Collection pack
Cottagecore 6x12 Blendable rubons
Cottagecore Die Cut Elements 
Cottagecore Laser cut Elements
Cottagecore Laser cut kitchen elements
Cottagecore Recipe Card pack
Cottagecore Wishing Bubbles epoxy stickers

Hope you enjoy this gorgeous collection as much as I do!

Hugs,
Michelle


Friday, 25 October 2024

Sweetest - 49 and Market

Hello!

Today I am on the blog with the beautiful BirdSong collection. Another beautiful collection - and I just love the colours - and has gorgeous birds, nests and flowers.

I have used the solid paper no 1 from the Birdsong 12 x 12 solid paper collection and the reverse side of the paper Trilling Moments from the 12 x 12 Collection paper. This was cut down to 11 x 11 and distressed along the edge before adhering to the solid paper. I matted the photos using frames and ephemera from the Ephemera pack.I have also distressed the edges of all of these. This was adhered to the page with foam tape for dimension.

I added the doilies under the Ephemera too, and then began to add lasercuts from the lasercuts Elements pack and the Wildflower laser cut pack, using foam tape. I also added Bashful Royal Spray paper flowers through the lasercut layers.

How cute is this bird nest? I also added a bird on this with foam tape. 


How cute is this little bird cage? I added it to the page on foam tape and the bird on a thinner foam tape so it looks like it is in the cage.
I have used the Essentials and the Blendable rubons around the page, and finished off adding some wishing bubbles.

These are the products I have used:
https://49andmarket.com/product/birdsong-12x12-paper-collection-pack/

https://49andmarket.com/product/birdsong-12x12-solid-collection-pack/

https://49andmarket.com/product/birdsong-paper-trilling-moments/

https://49andmarket.com/product/birdsong-solids-paper-1/

https://49andmarket.com/product/birdsong-ephemera-bits/

https://49andmarket.com/product/birdsong-essentials-rub-on-transfer-set/

https://49andmarket.com/product/birdsong-blendable-rub-on-transfer-set/

https://49andmarket.com/product/birdsong-laser-cut-elements/

https://49andmarket.com/product/birdsong-wildflower-laser-cuts/

https://49andmarket.com/product/birdsong-wishing-bubbles/

https://49andmarket.com/product/royal-spray-bashful/


Thanks for visiting the blog today.

Hugs,
Michelle


Thursday, 10 October 2024

Together Forever - 49 and Market

Hello lovelies

Today I have a layout created with the new colour swatch Terracotta - and this a lovely warm, and earthy collection. 


Using the paper no 4 from the 12 x 12 Terracotta collection pack, I cut this down to about 12 x 9 inches and adhered to paper no 5 leaving a gap at the top and bottom. I then cut off the name strips off the bottom of the other papers 1 - 3, and layered these with the large and small grosgrain lasercuts from the Terracotta Lasercuts Elements pack. 

The photos were matted with Ephemera, before adhering to the page. I then began to cluster with lasercuts, and adding in some tickets from the Ephemera.

I also added some rubons around the photos and flower clusters 
Aren't these little paper clips from the lasercuts just the cutest?

Thank you for visiting today. 

Hugs,
Michelle


Products I used:

https://49andmarket.com/collections/color-swatch-series-terracotta/

https://49andmarket.com/product/color-swatch-terracotta-12x12-paper-collection-pack/

https://49andmarket.com/product/color-swatch-terracotta-paper-4/

https://49andmarket.com/product/color-swatch-terracotta-paper-5-2/

https://49andmarket.com/product/color-swatch-terracotta-rub-on-transfer-set/

https://49andmarket.com/product/color-swatch-terracotta-ephemera-stackers/

https://49andmarket.com/product/color-swatch-terracotta-laser-cut-elements/

Wednesday, 25 September 2024

Beachy - 49 & Market

Hello!

It's a cold, grey day here in Christchurch as I write this blog, with snow falling further down south. One wouldn't think we are in spring right now. So how about a beach layout to remind us that summer is not far away? I have used the Summer Porch Collection for my layout.

I started with the dark blue and red papers from the Summer Porch 12x12 solids pack, tearing and distressing the edge of the dark blue paper (Paper 4) and adhering on top of the red solid paper (Paper 3). I then tore down the Summer Porch Splendor paper from the 12x12 Collection paper pack, and adhered this to the blue and red paper. I matted my photo with frames from the land lasercuts and the Ephemera pack and adhered this to the page with foam tape.
I then used a mix of both rubon transfers - the blendables and the essentials pack around my photo. I cut the piece with the sail boat so it worked into my layout - I love how this worked out on the page. 
I have used laser cuts from both the land and sea pack - the knots have been cut so that I was able to add these on top and below my photo. I also added some tickets from the Ephemera pack. I added the flowers, leaves and the boat in layers using foam tape to create dimension.

Thank you for visiting the blog today. Below is the list of products that I have used on this page,

Hugs,
Michelle

https://49andmarket.com/product/summer-porch-12x12-solids-collection-pack/

https://49andmarket.com/product/summer-porch-12x12-paper-collection-pack/

https://49andmarket.com/product/summer-porch-blendable-rub-on-transfer-set/

https://49andmarket.com/product/summer-porch-essentials-rub-on-transfer-set/

https://49andmarket.com/product/summer-porch-by-land-laser-cuts/

https://49andmarket.com/product/summer-porch-ephemera-bits/

https://49andmarket.com/product/summer-porch-by-sea-laser-cuts/


Tuesday, 10 September 2024

Delightful - 49 & Market


Hello lovelies

I have a new favourite collection - the Vintage Orchard Collection. It must have something to do with the colours - such beautiful warm tones - and I absolutely love the wildflower lasercuts in this collection. Here is my layout created with this gorgeous new range:


I have used the reverse side of the Vintage Orchard paper Apple Delight from the paper collection pack as my base for the layout. The top paper is the the bonus sheet behind the cover of the 12 x 12 solid paper collection, which I have torn down and then adhered to the Apple Delight paper. I have layered the Stacked Frames on top of the photo, then added the film strips (which I cut in half to be able to stick out the top and bottom of my framed photo) from the Acetate assortment pack. I also distressed the edges of the frames, before adhering to the paper with foam tape. 
I then layered ephemera and laser cuts (from both the Wildflower pack and the Elements pack) to the top left corner with foam tape for dimension and also added some Ivory Royal Spray flowers. I did the same at the bottom right corner - how cute is that scarecrow and the barrow?
I then cut ½" strips from the washi tape sheet and added these to the top and bottom of the layout. Once I was done I added rubons from the Essentials rubon pack around my layers.
I finished off adding the title "delightful"from the chipboard words pack.

I hope you have enjoyed the blog post, thanks for stopping by.

Hugs 
Michelle

https://49andmarket.com/product/vintage-orchard-paper-apple-delight/

https://49andmarket.com/product/vintage-orchard-12x12-solid-collection-pack/

https://49andmarket.com/product/vintage-orchard-ephemera-bits/

https://49andmarket.com/product/vintage-orchard-essentials-rub-on-transfer-set/

https://49andmarket.com/product/vintage-orchard-wildflower-laser-cuts/

https://49andmarket.com/product/vintage-orchard-stacked-frames/

https://49andmarket.com/product/vintage-orchard-washi-sheets/

https://49andmarket.com/product/royal-spray-ivory/

https://49andmarket.com/product/vintage-orchard-12x12-paper-collection-pack/

https://49andmarket.com/product/vintage-orchard-acetate-assortment-set/

https://49andmarket.com/product/vintage-orchard-chipboard-words/

https://49andmarket.com/product/vintage-orchard-laser-cut-elements/

Sunday, 25 August 2024

49 and Market - Brotherhood

Hello 49 and Market Fans

How about this new Rust & Rev's collection? It makes for a perfect male page - and just love the rustic feel that comes from this collection. Here is my layout created using this new collection:

The base of my layout is the Rust and Revs Journey paper. I sanded down the edge of this paper. I then cut the reverse side of the Route paper to 11"x11" and distressed the edges before adhering to the base page, also adding a chain strip off the Washi Tape sheet. I tore a piece off the Freedom paper, sanded the paper and then curled the edges and placed this in the centre. (All papers come from the 12x12 collection pack). I matted the photo using two different sizes of frames from the Die Cut elements. I used the two rounded chain pieces from the Laser Cuts and the added the two leather look alike elements (from the die cut pack) by curling the edges under the chain to make it look like a picture frame. Then popped the studs by adding wishing bubbles, adhered this to the back of my photo and then added this the page - to look like a hanging picture. I adding a chain between this so it looks like the chain is running through the frame.

I then built up a cluster on the left side of the photo using laser cut elements and die cuts adding different thickness of foam tape to add dimension the page. I also used laser cut piping to create the feature at the bottom of the page.

I added clustering to the right of the photo also using the laser cut elements. And I have added some rubons to create the feature at the top right and the quote "little boys bring joy - big boys bring adventure". I have finished adding some of the cogs from the laser cut pack.

Thank you for visiting the blog today.

Hugs,

Michelle

https://49andmarket.com/product/rust-and-revs-paper-freedom/

https://49andmarket.com/product/rust-and-revs-paper-route/

https://49andmarket.com/product/rust-and-revs-paper-journey/

https://49andmarket.com/product/rust-and-revs-rub-on-transfer-set/

https://49andmarket.com/product/rust-and-revs-laser-cut-element-set/

https://49andmarket.com/product/rust-and-revs-die-cut-elements/

https://49andmarket.com/product/rust-and-revs-washi-tape-sheet-set/

https://49andmarket.com/product/rust-and-revs-wishing-bubbles/

https://49andmarket.com/product/rust-and-revs-12-x12-collection-pack/


Saturday, 10 August 2024

Waiting for Santa - 49 and Market

Hello 49 and Market fans

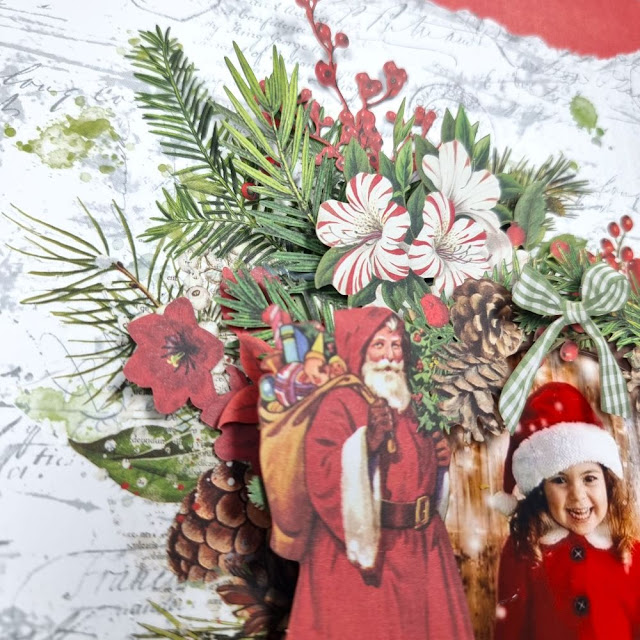
Today I am on the blog featuring a layout created with the gorgeous new Evergreen Season collection.

I have used 2 papers from the 12 x 12 collection paper collection. Using the paper "Rejoice in the Season" first. this was cut down to 11" x 11" and adhered to the reverse of the "Ceremonious Poinsettias" paper. The photo was adhered behind one of the frames from the pack of the Chipboard Frames, and then adhered to the paper just above the flower print on the paper on the right. I then began to add layers of flowers and leaves from the wildflower lasercut pieces around the bottom of the frame, using foam tape to create depth and dimension. I have also curled the pine cones to make them look dimensional and then adding them to the page.
I have added some botanical rubon transfers under the layered flower cluster and up the side of the frame on the bottom left. I added some red star/sparkles from the Sentiments rubon transfers.
I created a cluster in the top left corner with the wildflower lasercuts as well as adding the baubles from the lasercut elements. The Merry Christmas wording is from the chipboard words pack.  There are also foliage rubon transfers under this flower cluster. 
I have added a flower in the cut at the top of the page as an extra feature

Thank you for popping by the blog today.

Hugs,
Michelle


https://49andmarket.com/product/evergreen-season-12x12-paper-collection-pack/
https://49andmarket.com/product/evergreen-season-paper-rejoice-in-the-season/
https://49andmarket.com/product/evergreen-season-paper-ceremonious-poinsettias/
https://49andmarket.com/product/evergreen-season-sentiments-rub-on-transfer-set/
https://49andmarket.com/product/evergreen-season-botanical-rub-on-transfer-set/
https://49andmarket.com/product/evergreen-season-laser-cut-elements/
https://49andmarket.com/product/evergreen-season-wildflowers-laser-cuts/
https://49andmarket.com/product/evergreen-season-chipboard-frames/
https://49andmarket.com/product/evergreen-season-chipboard-words/


Wednesday, 10 July 2024

Memorable - 49 and Market

Hello 49 and Market fans

I have created a layout using the elements of the new collection Color Swatch Willow on white cardstock. I love this new collection and the little pops of red flowers compliment the range beautifully.

I started by adding a frame from the Willow Frame set - there are various sizes and I used the frame for a 4x6 photo. I then layered various ephemera behind the photo using the Willow Ephemera Stackers elements, as well as some of the Willow lasercuts.
I have sanded the edges of the Ephemera and the frames before I adhered these. I then added rubons around the photo by cutting bits out of the sheets and adding them around the photo layers.
Once I had added the rubons, I layered up lasercut leaves and flowers.

I finished off cutting bits of splatters from the rubon sheet and dotting these around the page, plus adding some butterflies and the dragon fly.

Thanks for popping in to visit the blog.

Hugs,
Michelle


https://49andmarket.com/product/color-swatch-willow-frame-set/
https://49andmarket.com/product/color-swatch-willow-laser-cut-elements/
https://49andmarket.com/product/color-swatch-willow-ephemera-stackers/
https://49andmarket.com/product/color-swatch-willow-rub-on-transfer-set/


Monday, 10 June 2024

Backpack Mini Album - Academia

Hello there

Isn't this Academia collection just gorgeous! I love the colours. I have created a mini album that looks look a little school satchel/backpack


I used chipboard to create a box with folders inside to keep photos inside

The photo folios on the inside have been created with the Academia paper "You did it" - which has 12 grades on it and then cut these up into 12 folios. These were then decorated with layers of lasercut elements. 
Photo mats are in the back of the cards.
I created little pockets on the sides - one pocket has the maths instruments lasercuts and the other pencil lasercuts.

I used a number of papers to decorate the mini album, and have added some rubons on the outside of the satchel and washi tape on the cards. 

Hope you have enjoyed my project - I had lots of fun creating this.

Hugs,
Michelle


Products used:

https://49andmarket.com/product/academia-paper-you-did-it/
https://49andmarket.com/product/academia-paper-well-done/
https://49andmarket.com/product/academia-paper-fun-times/
https://49andmarket.com/product/academia-paper-book-warm/
https://49andmarket.com/product/academia-laser-cut-element-set/
https://49andmarket.com/product/academia-washi-tape-sheet-set/
https://49andmarket.com/product/academia-rub-on-transfer-set/


Friday, 10 May 2024

100% Authentic - 49 and Market

Hello 49 and Market Fans

Back today with a layout created with the new Color Swatch Ochre collection. I really love the color tones in this collection.

I have used the reverse side of the Color Swatch Ochre paper 4 and then cut down the Color Swatch Ochre paper 2 and distressed the edges before adhering to the number 4 paper. At the top right and bottom left of paper 2, I curled up the edge a bit and added some lace from the Ochre Lasercut Elements. The photos were framed with the Ochre frame set, and the main photo matted with layers of Lasercuts and Ochre Ephemera Stackers. This was then adhered to the page on thick foam tape.


I added some leaf Ochre rubons and then layered lasercut elements and laser cut minis, flowers and leaves, down the side of the photos. These were done in various layers with different thickness foam tape. I added the wording 100% Authentic - which is in the Ochre rubons pack.
Once I was done with all my layering I then added the rubons all around to create a "mixed media/stamping effect".

Thank you for visiting the blog today.

Hugs,
Michelle

https://49andmarket.com/product/color-swatch-ochre-paper-4/
https://49andmarket.com/product/color-swatch-ochre-paper-2/
https://49andmarket.com/product/color-swatch-ochre-laser-cut-elements/
https://49andmarket.com/product/color-swatch-ochre-rub-on-transfer-set/
https://49andmarket.com/product/color-swatch-ochre-ephemera-stackers/
https://49andmarket.com/product/color-swatch-ochre-frame-set/
https://49andmarket.com/product/color-swatch-ochre-mini-laser-cut-elements/