Thursday, 10 July 2025

Life is an Adventure - 49 & Market

Hello lovelies,

Oh my gosh!! Isn't this Nature's Haven just the cutest - and just so divine! I just love this new release. Here is my layout created with this gorgeous range


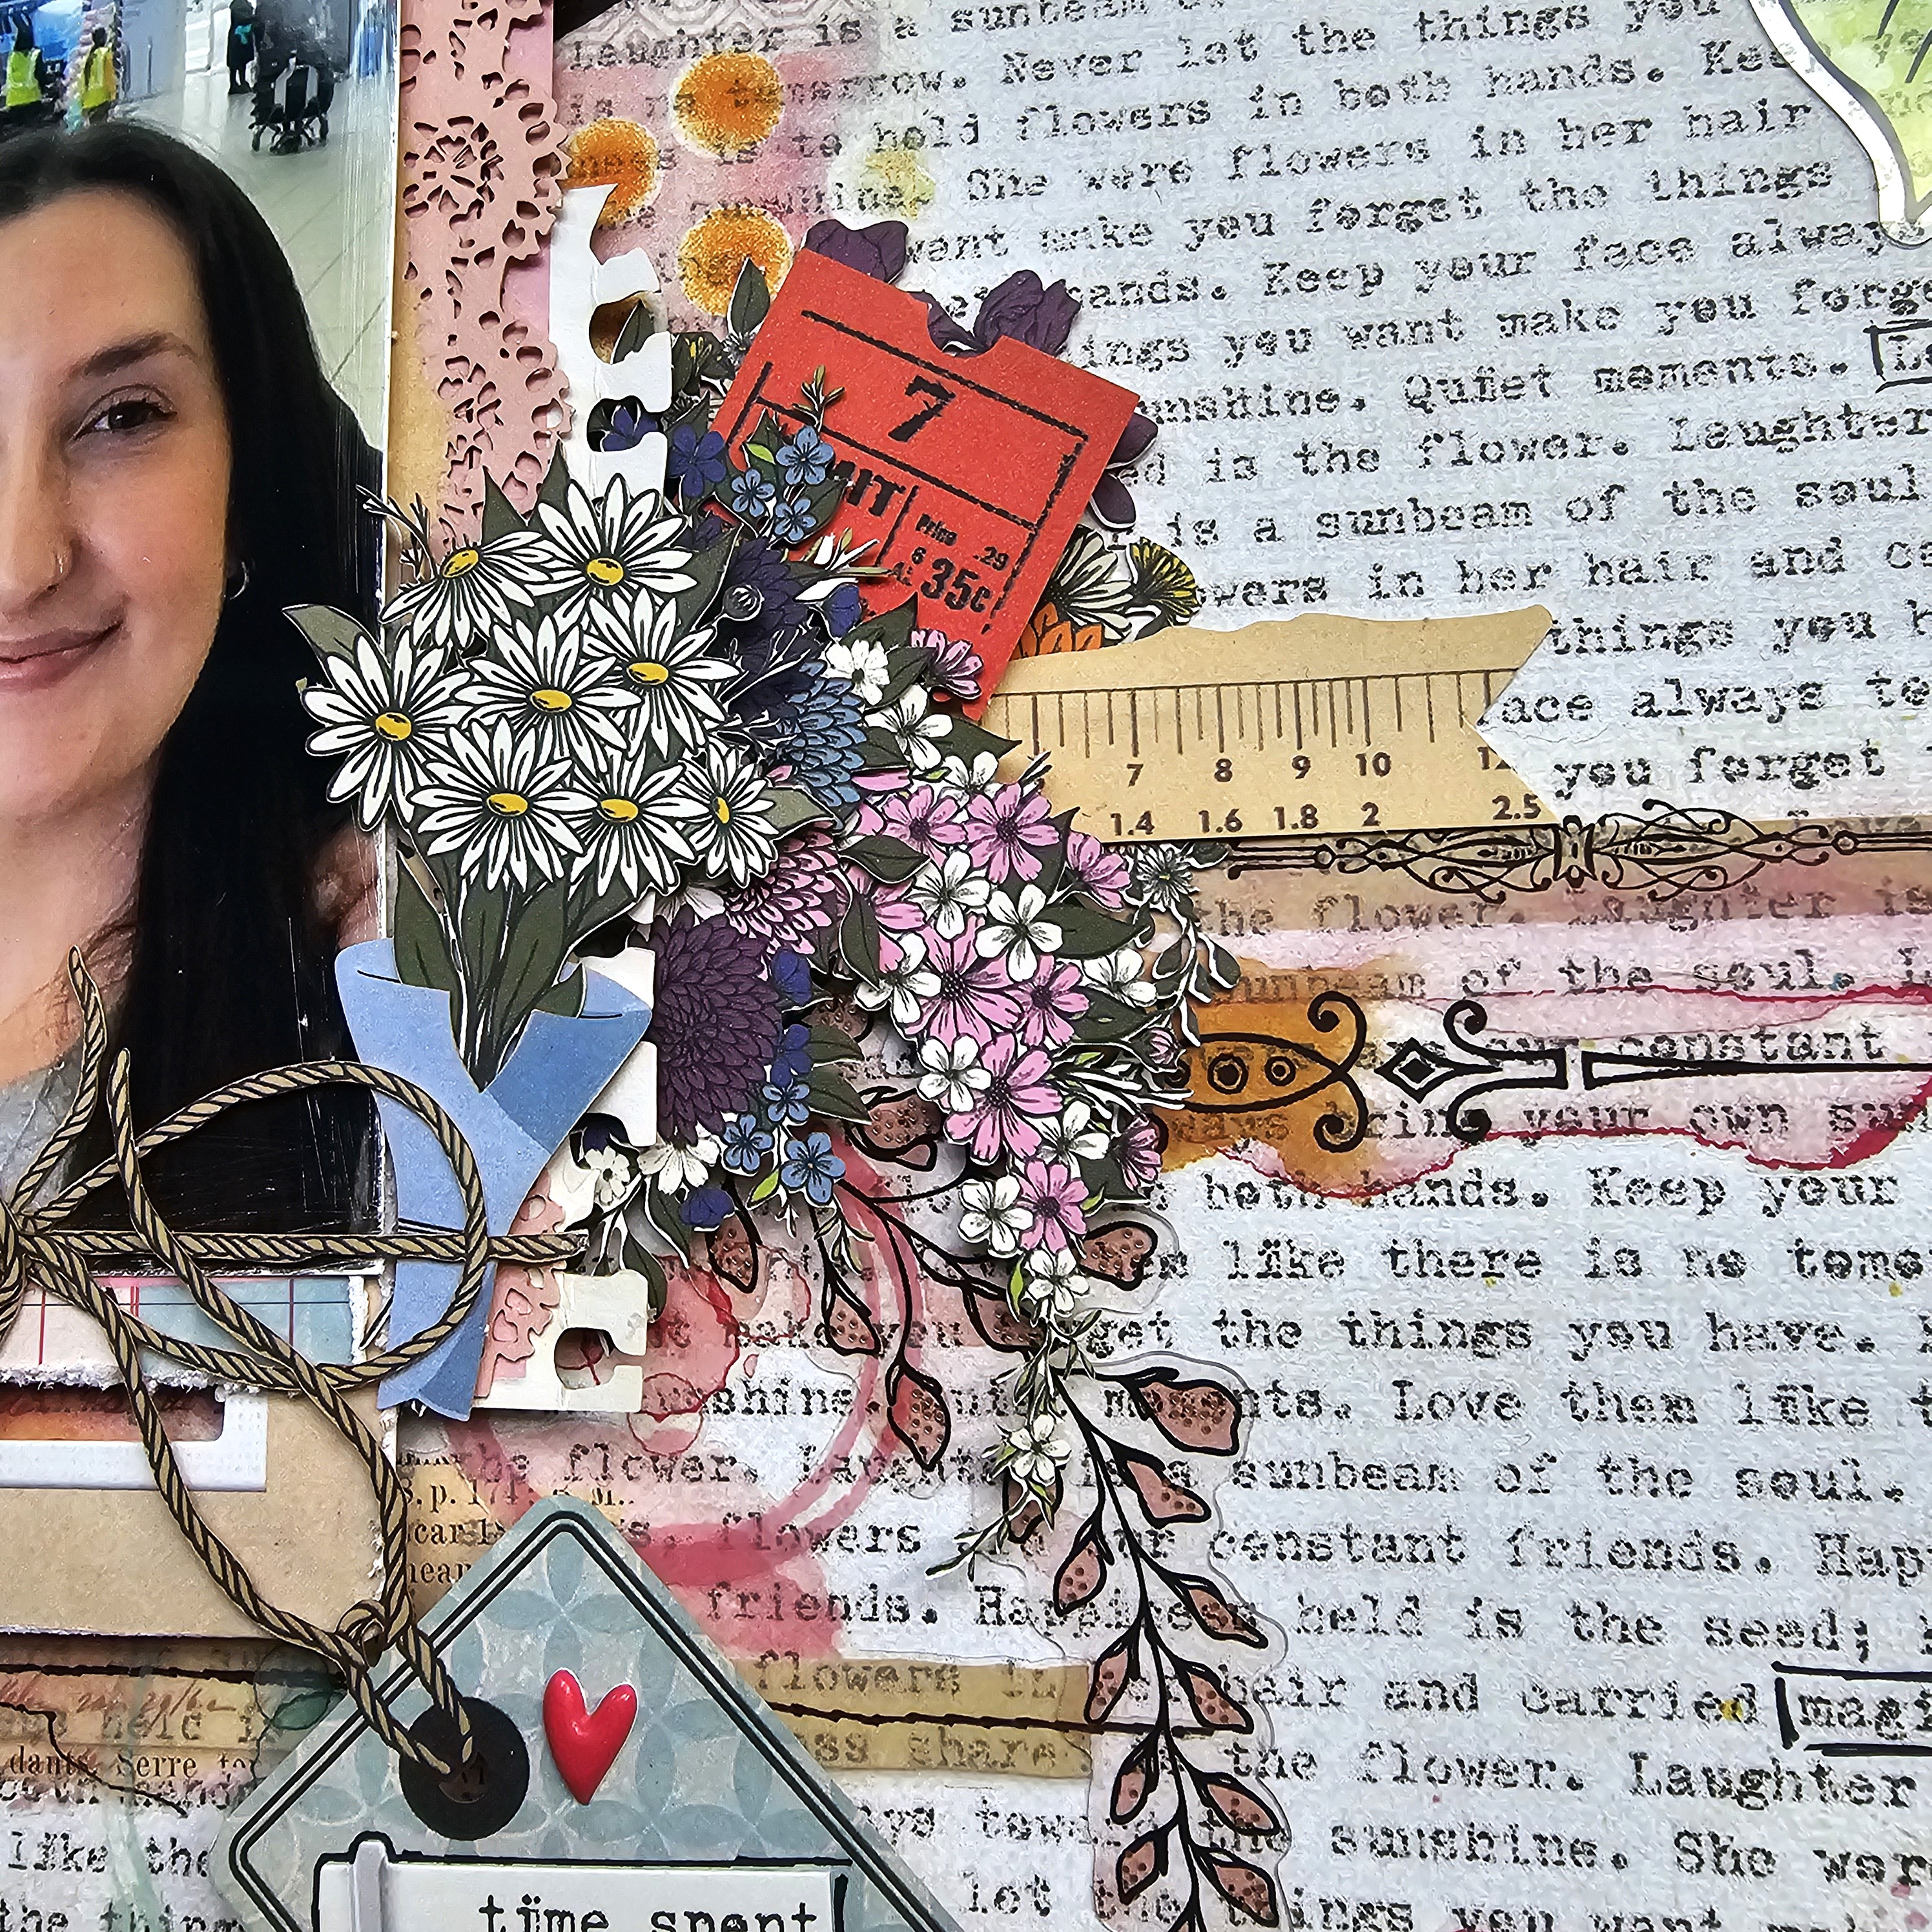
Isn't this range just adorable? And I couldn't resist the photo I found on Pinterest for this layout.  The base of the layout is the solids forest sheet from the 12x12 Solids Collection pack. I then tore the bottom edge (about 3 inches) of the Blossom Sprinkle (just love the name of this paper!) from the 12 x 12 Collection Pack, and adhered this to the Forest paper with about half an inch off the top of the Forest paper.  I matted the photo with a piece of the solids paper Strawberry Love and then placed the frame from the Natures Haven Die Cut Elements ontop and adhered this to the page on foam tape, allowing to create flower clusters and the fences to tuck under this.

I first started with the fences and wagon wheel from the Laser Cut Element set, before adding flowers, strawberries and leaves from the Laser Cut Wildflower set. 


Aren't these little animals just the cutest - also from the Laser Cut Element set.

I then finished off adding the little light bulb branch feature and some flowers at the top of the page - adding foam tape to this, including under the light bulbs.


Thank you for visiting the blog today. I hope you love this Nature's Haven Collection as much as I do!


Hugs,

Michelle


Products used:

https://49andmarket.com/product/natures-haven-12-x12-collection-pack/

https://49andmarket.com/product/natures-haven-paper-blossom-sprinkle/

https://49andmarket.com/product/natures-haven-12-x12-solids-collection-pack/

https://49andmarket.com/product/natures-haven-solids-sheet-forest/

https://49andmarket.com/product/natures-haven-solids-sheet-strawberry-love/

https://49andmarket.com/product/natures-haven-laser-cut-element-set/

https://49andmarket.com/product/natures-haven-laser-cut-wildflower-set/

https://49andmarket.com/product/natures-haven-die-cut-elements/


Wednesday, 25 June 2025

Hello lovelies

I just cannot resist this Little Dreamers/Little Celebrations collections, and have created another layout

The base of the layout is reverse side of the Little Dreamers paper Tiny Treasures. Tearing about an inch off the Little Celebrations/Little Dreams solid paper no. 4 (cut a circle mat for the photo in the middle first), adhere that to the Tiny Treasures paper. Again tearing the Little Dreamers Over the Moon paper and adhere this on top of the solids paper. There is a moon with flowers in the Little Dreamer Laser Cut Elements, which I have adhered behind the photo matt, and adhered this with thick foam tape to the paper. 
From there I began layered laser cut flowers and leaves from the Little Celebrations Laser Cut Set. And adding the little animals and the light bulbs from the Little Dreamers Laser Cut Set.

I then added rubons from the Little Dreams Rubon Transfer set - the clouds and rainbow, then added the title "Twinkle Twinkle Little Star" from the Little Dreamer Chipboard Words, and adding the Teddy and balloons from the Little Dreamer Laser Cut Set.
I finished off adding the sleeping fox at the top and the rubon stars.

Thank you for visiting the blog today.

Hugs,
Michelle


https://49andmarket.com/product/little-dreamer-little-celebrations-solid-paper-4/

https://49andmarket.com/product/little-dreamer-paper-tiny-treasures/

https://49andmarket.com/product/little-dreamer-paper-over-the-moon/

https://49andmarket.com/product/little-dreamer-chipboard-words/

https://49andmarket.com/product/little-dreamer-6x12-rub-on-transfer-set/

https://49andmarket.com/product/little-dreamer-laser-cut-element-set/

https://49andmarket.com/product/little-celebrations-laser-cut-element-set/

Tuesday, 10 June 2025

All things grow better with love - 49 and Market

Hello, 49 and Market Fans

Today, I'm showing another creation using the One Perfect Day collection. 

I have used One Perfect Day Tender Moments paper for the base of my layout. I have then cut 4" x 6" pieces from Solid paper 2 and Solid paper 3, distressed and sanded the edges and layered these behind the photo. I then adhered the base paper with foam tape. Cutting the window frame from the Laser Cut Element set in half, each half was added on either side of the photo.
I then added layers of Laser Cut Wildflowers using tweezers to get these under the window frames and using foam tape to create dimension.
From the Die Cut Elements, I then added various tags between the matting, at the top and below the photo. I have also added Die Cut Elements among the flower laser cut elements.
The title "All things grow better with love" is a chipboard word. I have finished off adding some bits of rubons transfers.

Thanks for visiting the blog today.

Hugs,
Michelle


https://49andmarket.com/product/one-perfect-day-paper-tender-moments/
https://49andmarket.com/product/one-perfect-day-solid-paper-2/
https://49andmarket.com/product/one-perfect-day-solid-paper-3/
https://49andmarket.com/product/one-perfect-day-laser-cut-element-set/
https://49andmarket.com/product/one-perfect-day-laser-cut-wildflowers/
https://49andmarket.com/product/one-perfect-day-die-cut-elements/
https://49andmarket.com/product/one-perfect-day-chipboard-words/
https://49andmarket.com/product/one-perfect-day-6x12-rub-on-transfer-set/


Sunday, 25 May 2025

Miracle - 49 and Market

Hello lovelies

Oh my - how cute are these latest ranges Little Dreamers and Little Celebrations! Here is my layout using a mixture of both ranges:

Aww - isn't this just the cutest? My base page is the Little Celebrations Faded Memory paper from the 12 x 12 Collection pack of papers. I then used the inside cover of the Little Celebrations Lasercut sheet for the frames and the script piece as the matting layers behind my photo. The script piece was cut in half, and the edges distressed.  
I have then started layering around the photo with Lasercut flowers from the Little Celebrations and the cute little animals from the Little Dreamers Lasercuts. I added the little heart from the Little Dreamers Chipboard pieces, as is the title "Miracle" and the wording "you are so loved". 
I have added these gorgeous balloons - and added a bow for extra dimension - all Lasercuts
I added this cute sleeping fox from the Little Dreamers Lasercuts and the leaves, flowers, and bulbs from the Little Celebrations Lasercuts. 
The banner and the cot are also Lasercuts - and I just love the little birds. I have finished off adding some star rub-ons from the Little Dreamers Rub-on transfers, and tearing some pieces at the top and bottom of the paper, and added a 6" x 8" paper from the 6" x 8" Little Dreamers paper pack.

Thank you for visiting the blog today!

Hugs,
Michelle

Little Dreamers Lasercuts
Little Celebrations Lasercuts
Little Celebrations 12 x 12 Paper collection
Little Dreamers Chipboard pieces
Little Dreamers Rub-on Transfers
Little Celebrations 6" x 8" papers


Friday, 25 April 2025

You're Simply the Best - 49 & Market

Hello 49 and Market Fans

Dennis Bruton has blown us away again with Rust and Revs 2.0, and the elements in this collection are truly amazing! Here is my project I have created using this gorgeous collection:

I have used the Rust and Revs Steadfast paper as the base for my layout, and then torn the reverse side of the Tenacious paper and adhered this to the Steadfast page. Both the Steadfast and the Tenacious paper come from the 12 x 12 Paper Collection. Then I used the reverse side of Solids paper no 4 from the Solids 12 x 12 paper pack and tore this a little smaller than the Tenacious paper and adhered this. The photo is matted on the same Solids paper but on the brown side and the paper has been distressed before I adhered the photo. I have layered chipboard frames from the Chipboard Set under the photo. These are just amazing! Before adhering this, I placed this on the page for placing so I could work out where to add the rub-ons (the film strip type rub-on and solid corners). Then I added a strip of the checked fabric washi tape, adding the brown and blue rub-ons, before adhering the photo and frames. 
I then added the tags under either side of the photo (distressing the edges) - these are from the Die-cut Elements pack, adding the "rope" and title "You're Simply the Best" from the Laser Cut Element Set. 
I have also added rub-on cogs and numbers

The "leather" straps holding the photo are from the Laser Cuts elements page. To create the leather effect, I have scrunched these up and then sanded them, adding them with a bit of a bend to the page and the photo.

This collection is amazing - there are so many gorgeous elements - like the cars and the BBQ elements - it makes a perfect collection for the boys!

Products used:

https://49andmarket.com/product/rust-revs-2-0-paper-steadfast/

https://49andmarket.com/product/rust-revs-2-0-paper-tenacious/

hhttps://49andmarket.com/product/rust-revs-2-0-solids-sheet-4/

https://49andmarket.com/product/rust-revs-2-0-6x12-rub-on-transfer-set/

https://49andmarket.com/product/rust-revs-2-0-laser-cut-element-set/

https://49andmarket.com/product/rust-revs-2-0-die-cut-elements/

https://49andmarket.com/product/rust-revs-2-0-chipboard-set/

https://49andmarket.com/product/rust-revs-2-0-fabric-tape-sheet-set/


Thanks for visiting the blog today!

Hugs,
Michelle


Thursday, 10 April 2025

All mine and I love it - 49 and Market

Hello lovelies

Oh wow, wow ...  aren't we lucky to have Vicki Boutin designing for 49 and Market? This new collection the Flower Emporium is just so lovely and has such fun elements to create with. Here is a layout I have created using this new collection

I chose the typed page from the 12 x 12 paper pad, tore the top and bottom corners and added the orange side of the Staples paper 4 under this.  I layered the photo with some laser cut lace and some ephemera pieces and adhered this off to the left of the page. 
I did a flower cluster on the bottom right of the photo using laser cut pieces - how cute is the flower bouquet and it slips into the bouquet holder - especially cut to hold the flowers! I have layered other laser cut flowers and acetate leaves from the foiled die-cut assortment and added rub on transfers, 

I added the paper rope knot from the laser cutsand the tag with some laser cut wording and puffy sticker hearts. Then added the wheelbarrow laser cut to the left of the photo using foam dots and added a laser cut flower to the top as if it was in the wheelbarrow. I have also added more rub ons and acetate leaves. 
I created a flower cluster to the top right of the page using laser cut flowers, vellum and acetate leaves from the foiled die-cut assortment, finishing it off with rub ons.
I used a fine-tipped black pen and drew around words on the background paper - like love and happiness above. I added the title All Mine and I love it from the rub ons and also hand drew frame around this with the fine tip pen.

This is such a fun collection and I hope you enjoy creating with it as much as I have.

Hugs,
Michelle

Products:
The Flower Emporium 12 x 12 paper patterns paper pad
The Flower Emporium Staples Pack - paper 4
The Flower Emporium Rub-on Transfers
The Flower Emporium Puffy Stickers
The Flower Emporium Journaling Ephemera Bits
The Flower Emporium Laser Cut Elements 
The Flower Emporium Foiled Die-Cut Assortment


Monday, 10 March 2025

Adventure - 49 and Market

Hello there

Oh my, this new Collection called One Perfect Day designed by Joanne Baine is just beautiful. Here is my project I have created using this beautiful range,

The base of my layout is the paper called Tender Moments. I have then fussy cut the flowers from the paper called Beloved, and used the remaining paper to matt my photo. I have also used die cuts to add layers behind my photo which is added to the paper with foam tape. I have then added the fussy cut flowers to the top of the photo and to left side of the photo.
Cut the large window frame from the Die Cuts and place on either side of the photo. I then added various layers of the lasercuts from the Wildflowers pack.
Doing the same on the right side of the photo, adding the other half of the window, Wildflower lasercuts and adding the diecut heart.
I then also created a feature at the top left corner of the layout, using a diecut frame and the wording Adventure, and adding Wildflower lasercuts to create the cluster. To finish off I have added Citrus rubons to the page.

Although this is a wedding themed paper collection, I have shown here how this can be used also a non-wedding themed paper.

Thanks for visiting the blog today.

Hugs
Michelle

Tender Moments Paper – OFD-30808 (base paper)

Beloved Paper – OFD-30839 (fussy cutting and photo matting)

Citrus Rub-ons (https://49andmarket.com/product/essential-textblends-rub-on-transfers-citrus/)

Wildflower Lasercuts

Die Cuts